
How To Process Credit Card Transactions
Setup to Process Credit Card Transactions
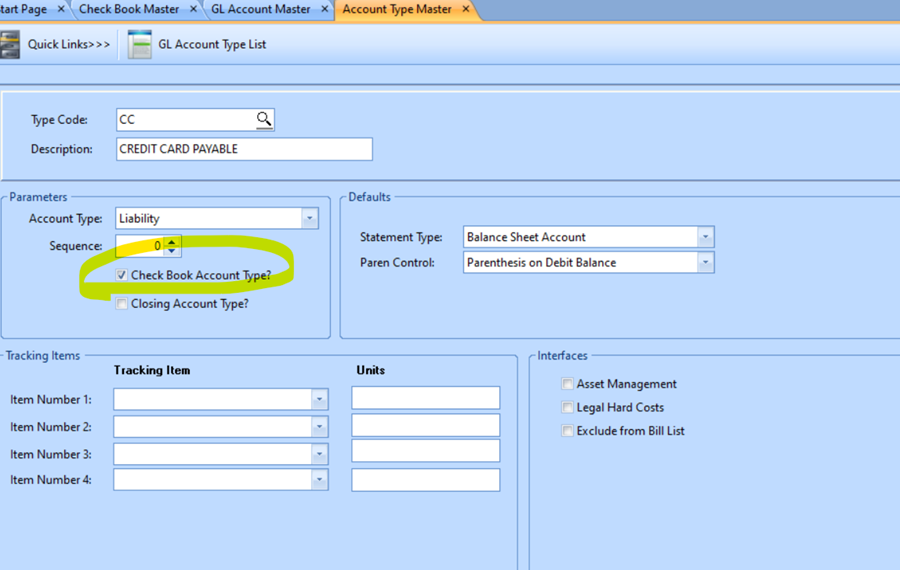
New Account Type
 NAVIGATION: MAINTAIN menu > Account Type Master
- TYPE CODE, enter a two digit code to identify the account, i.e., CC
- DESCRIPTION, type the description i.e., CREDIT CARD PAYABLE
- PARAMETERS Section
- Account type should be set to liability
- Sequence – leave set to zero
- Check mark the Check Book Account Type
- Closing Account type should Not be checked
- DEFAULTS
- Statement Type should be Balance Sheet
- Paren Control should be Parenthesis on Debit Balance
- TRACKING ITEMS – do not use
- INTERFACES – do not use
- Save the Account Type
- Then you need to setup new GL Account, Pay Group and a Check Book. As you set each up, you will need to update each with links to the others.
Setup New GL Account
NAVIGATION: MAINTAIN menu > GL Account Master
- ACCOUNT NUMBER, enter a new Liability Account to use for this Credit Card.
- Horizon does not recommend using 1 Account for multiple credit cards. Create a unique Account for each card.
- DESCRIPTION, Enter a full description to identify this card
- ACCOUNT TYPE, enter CC
- Statement Type should default to Balance Sheet
- Paren Control should default to Parenthesis on Debit Balance
- CB LOCATION, select the company
- Click Apply
- CHECK BOOK, Come back and enter this after saving your checkbook ID below.
- Click Apply
Help Topic: Add a New General Ledger Account
Setup New Checkbook for Credit Card
The Credit Card account will be setup as a check book. This CC Check Book will contain the Charges (purchases) on this account and the Payments to lower the balance due. You will be able to reconcile the account to your Credit Card Statement similar to a bank reconciliation.
NAVIGATION: MAINTAIN menu > Check Books
- CHECK BOOK ID: enter a code to identify the account, i.e., “DISC11F”
- The ID code is permanent and cannot be changed.
- Recommended: start code with “CC” or the Card Name “DISC” for Discover, “VISA” “MC” for MasterCard, etc. Ending with an internal designation to easily identify it.
- Horizon does not recommend using the last 4 digits of the Card Number as part of the code, if your account information is compromised, the card # will change.
- DESCRIPTION: enter a full description to identify this card.
- The Description can be changed later such as if the user changes. i.e., “Discover 11 – Fiscal John P”
- ROUTE/VENDOR: enter the vendor number of the credit card vendor.
- You may use the same vendor for multiple cards, or create a unique AP vendor to match each card.
- TYPE: select “Credit Card Account”
- ACCOUNT NUMBER: enter the Credit Card Account #
- GL NUMBER: Enter the General Ledger Liability Account for this credit card.
- SEGEMENT: (Optional) If using Segment Balance controls: Enter the segment Control (usually first segment of GL account)
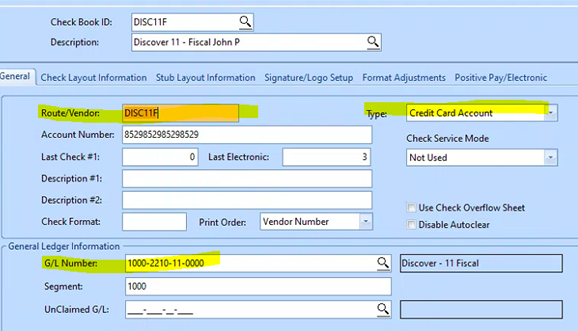
Help topic: Setup a Check Book
Setup a New Vendor
NAVIGATION: MAINTAIN menu > Vendor Master
- You may setup a new Vendor to match each Credit Card or use the same vendor# for several cards issued from that vendor.
- The vendor # must match the Route/Vendor used in the Checkbook, I.e. “DISC11F”
- Enter the pay group for how you will pay off the credit card.
 IMPORTANT: This is a regular cash pay group, this is NOT the Credit Card pay group used to enter credit charges.
- Electronic Type: Select your normal payment method for this vendor, Standard paper checks, Bank ACH, or Other Electronic.
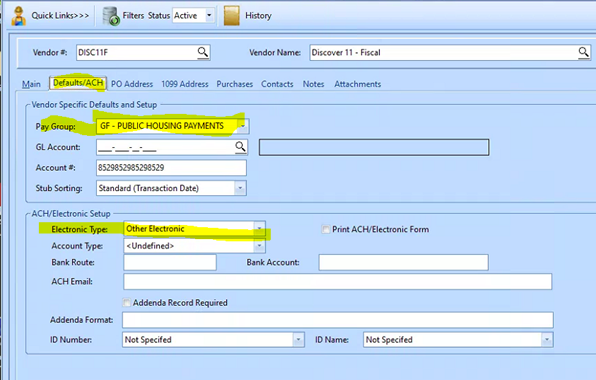
Help topic: Add or Modify a Vendor
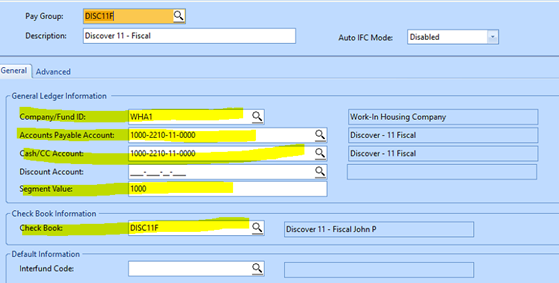
Setup New Pay Group
There should be one Pay Group for each credit Card Account
Help Topic: Setup a Pay Group
NAVIGATION: MAINTAIN menu > Pay Group Master
- Pay Group: Recommended Enter the same Code as used For the Check Book. i.e., “DISC11F”
- DESCRIPTION: Enter the same Description as used For the Check Book, i.e., “Discover 11 – Fiscal John P”
- COMPANY/FUND ID: Enter the Company this check book is in
- ACCOUNTAS PAYABLE ACCOUNT and the CASH/CC ACCOUNT should both be setup with the same GL account setup above as a CC liability account.
- SEGMENT: (Optional) If using Segment Balance controls: Enter the segment Control (usually first segment of GL account)
- CHECK BOOK: Enter the check book setup above i.e. “DISC11F”
Entering Credit Card Transactions
NAVIGATION: Activities Menu > Voucher Entry > Credit Card Entry
New entry area for credit cards
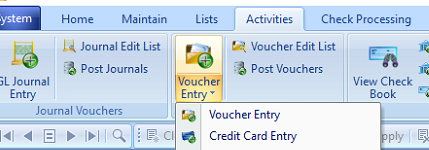
Activities Voucher Entry: the ICON is divided into top and Bottom, If you click the top of the icon it will open the normal AP Entry view. If you click the bottom of the icon you will get a choice of the Normal “Voucher Entry” or “Credit Card Entry”
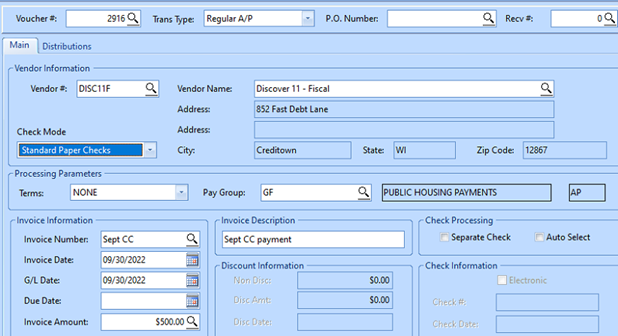
- Select Credit Card Entry. Enter the Payable voucher as usual
- Select the actual vendor to be paid
- Select the pay group for the credit card used as payment

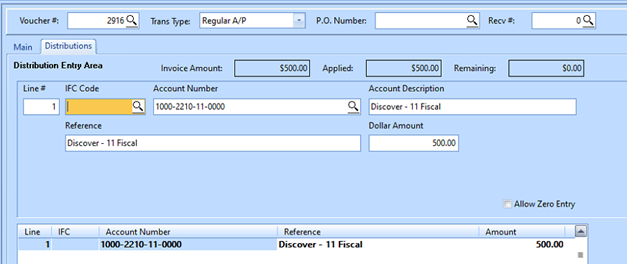
- Enter the distribution as normal. You may enter one line or many lines.
- When complete the Invoice Amount should equal the Applied.
- Remaining should be zero.

- Click the Clear/Add button to start a new CC voucher.
- Run the edit list and Post as normal. You may post with other regular AP pay groups or select just the CC pay group.
NOTE: Posting will create Debit entries to the Distribution accounts, Credit entry to the CC Pay group AP account “1000-2210-11-0000" and enter a charge in the CC checkbook “DISC11F” . The CC Checkbook will show charges as a positive amount for Amount Due.

Manual Payment on Credit Card
You may manually make a payment on the credit card, or you may use the Reconciliation process to record a payment (see instructions below). To manual enter a payment to lower your Credit Card balance due:
- Start a regular AP voucher
- Select the Vendor that was attached to the CC such as “DISC11F”
- Select the pay group for the check book that you are paying from. Do not use the Credit Card pay group.
- Use normal AP processes for paper checks or electronic payments, as needed.
- In the Distribution, enter the same CC Liability Account that was entered in the CC pay group and in the CC Checkbook setup. In examples above “1000-2210-11-0000".
- Post AP and process payment as usual.
- Using the 1000-2210-11-0000 in the distribution will Debit the 1000-2210-11-0000 account and enter a payment in the connected CC checkbook “DISC11F”. The payments to CC checkbook will show as a negative amount for reduction to Amount Due.
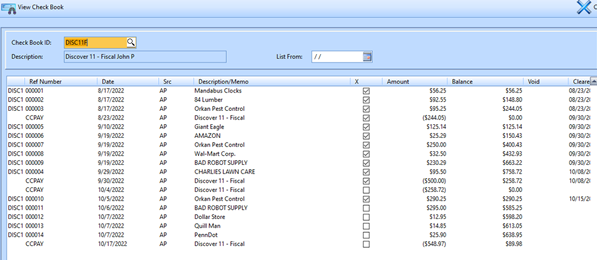
Reconciling Credit Card Statement
New Reconciliation area for credit cards. This reconciliation View will be mostly the same as the normal Check Book View.
Reconciliation Process: the ICON is divided into top and Bottom, If you click the top of the icon it will open the normal Check Book Reconciliation view. If you click the bottom of the icon you will get a choice of the Normal Check Book “Reconciliation Process” or “Credit Card Reconciliation”.
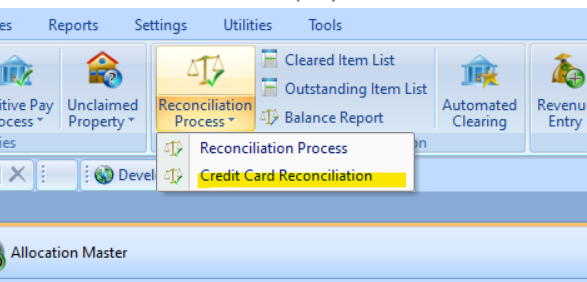
NAVIGATION: ACTIVITIES Menu > Reconciliation Process > Credit Card Reconciliation
- Select the Checkbook
- Enter that Credit Card Statement balance due
- Enter the Credit Card Statement Date
- Note: you may reconcile against online activity as often as needed, it may be done monthly, weekly, or daily.
- Click Start Reconciling
- The activity - up to that date, that was not previously cleared, will be shown.
- The top section will contain your payments to the credit card provider and other reductions to the balance due.
- The bottom section is your charged purchases and other increases to amount due.
- For each item on the Credit card statement, check it in the system.
- Any item on the statement that is not in the Reconciliation will need researched and entered.
- Some items in the system may not be on the statement and will not be checked. This may be normal and correct for charges that have not been processed to your card. However: if an old item continues to remain uncleared, please research if the entry is in error.
- You may come back to the reconciliation and click Start Reconciling as many times as needed until in balance.
- When balanced the “Difference” field will read $0.00. The Statement is not balanced and should not be completed until the “Difference” field reads $0.00.
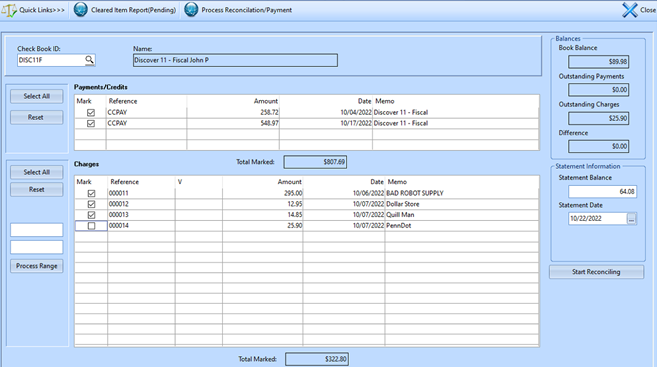
- When in balance press “Process Reconciliation/Payment”
- Click YES

- The Auto Payment options will be displayed. Use this option to auto create a payment for
- Statement Balance - will show the Statement Balance entered above
- Total Balance – the most current balance due in CC check book (Not for the Statement date)
- Other Amount – this will open a box to enter the amount to pay
- No Voucher Creation – if you will pay by entering manual payments in AP.

- Enter the Voucher date to use in AP (default to today).
- Click Continue to process the payment option chosen.
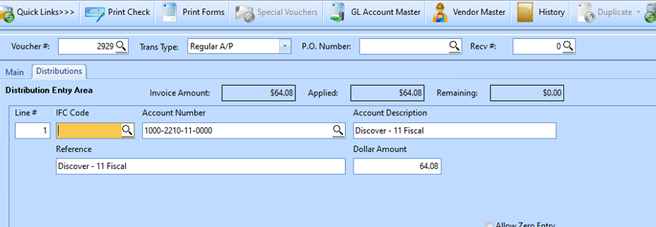
- An AP voucher will be auto-created for the vendor.
- It will use the Vendor’s Default Pay group for the amount selected at the end of the reconciliation process.
- The Distribution line will use the CC liability account entered in the Checkbook.

12/2022